Sub jobs: Difference between revisions
mNo edit summary |
m (→Overview) |
||
| Line 8: | Line 8: | ||
All sub jobs to the main job are listed here. Click on one of the jobs to edit it - depending on access rights - to add employees or categories, or to change checkboxes, the wages or times. ''If you want to go back to the main job, just click on the red highlighted title of the main job in the information on the left.'' | All sub jobs to the main job are listed here. Click on one of the jobs to edit it - depending on access rights - to add employees or categories, or to change checkboxes, the wages or times. ''If you want to go back to the main job, just click on the red highlighted title of the main job in the information on the left.'' | ||
To create a new subjob, go to "[[Short-record]]" or "Add Subjob". The latter will open a dialog box where you can either [[Plan personnel requirements (One day event)|plan personnel requirements]] or [[ | To create a new subjob, go to "[[Short-record]]" or "Add Subjob". The latter will open a dialog box where you can either [[Plan personnel requirements (One day event)|plan personnel requirements]] or [[request employees]]. | ||
If you have already created the subjobs and added employees, you can see the names of the individual employees and their status (requested / entered / booked) here. The symbol of the envelope with the red "x" means that the employee has not yet received a request or booking email yet. You can easily send them by clicking the letter icon in the upper right corner ("Contact employee"). Exclamation marks mean that there is a job overlap for the respective employee. Red = the employee is already scheduled for another job at the exact same time. Yellow = the employee is scheduled in another job on the same day. Click on the exclamation mark to see which job it is and the status of the employee. If you would like to be actively notified by the system of overlapping jobs and, if necessary, cancel them immediately, then check the box "Display warnings in case of overlaps for employees" under ''Administration > Jobs > Requests & Bookings''. | If you have already created the subjobs and added employees, you can see the names of the individual employees and their status (requested / entered / booked) here. The symbol of the envelope with the red "x" means that the employee has not yet received a request or booking email yet. You can easily send them by clicking the letter icon in the upper right corner ("Contact employee"). Exclamation marks mean that there is a job overlap for the respective employee. Red = the employee is already scheduled for another job at the exact same time. Yellow = the employee is scheduled in another job on the same day. Click on the exclamation mark to see which job it is and the status of the employee. If you would like to be actively notified by the system of overlapping jobs and, if necessary, cancel them immediately, then check the box "Display warnings in case of overlaps for employees" under ''Administration > Jobs > Requests & Bookings''. | ||
Latest revision as of 08:34, 12 July 2023
You can create as many subjobs as you like for each main job. If you start with a single job and then add subjobs, the single job automatically becomes the main job. In the job itself, you will find the "Subjobs" icon as a second icon in the top right corner. However, this icon only appears when you create a new job or when you are in the main job. If you are already in a subjob, this icon becomes the "Overview" icon, which gives you a time overview in the form of a timeline.
The subjobs can also be filtered using the filter icon. In this way, you can individually define whether, for example, only a time period or only subjobs with a certain status will be displayed.
Overview
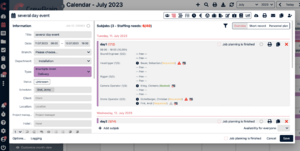
All sub jobs to the main job are listed here. Click on one of the jobs to edit it - depending on access rights - to add employees or categories, or to change checkboxes, the wages or times. If you want to go back to the main job, just click on the red highlighted title of the main job in the information on the left.
To create a new subjob, go to "Short-record" or "Add Subjob". The latter will open a dialog box where you can either plan personnel requirements or request employees.
If you have already created the subjobs and added employees, you can see the names of the individual employees and their status (requested / entered / booked) here. The symbol of the envelope with the red "x" means that the employee has not yet received a request or booking email yet. You can easily send them by clicking the letter icon in the upper right corner ("Contact employee"). Exclamation marks mean that there is a job overlap for the respective employee. Red = the employee is already scheduled for another job at the exact same time. Yellow = the employee is scheduled in another job on the same day. Click on the exclamation mark to see which job it is and the status of the employee. If you would like to be actively notified by the system of overlapping jobs and, if necessary, cancel them immediately, then check the box "Display warnings in case of overlaps for employees" under Administration > Jobs > Requests & Bookings.
By clicking on the clock symbol, working time can be recorded manually. The color of the clock already provides information about the status of the working time recording. Black: no times recorded yet. Green: actual times recorded. Yellow: target times recorded. Red: actual times deviate strongly from the target times.
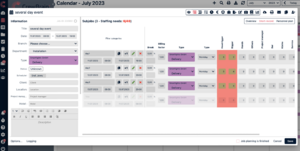
Short-record
The short-record is used to quickly record subjobs plus their staff requirements. In this way, you can make a quick list of what subjobs are pending and how much staff you need. To do this, click on "Short-record" in the upper right corner. A screen will open where you can name the subjob or shift and assign a date and time. Further on the left you can specify the payroll factor, the job type (is highlighted in color if colors have been assigned for it in the administration), the type (e.g. Workday, Travelday, Offday) and the number of employees required per category as well as the number of vehicles required. For even faster processing, it is possible to navigate within the categories using the arrow keys.
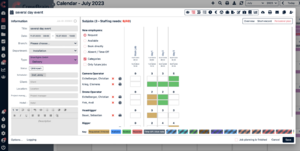
Personnel plan
In order not to have to schedule all employees individually via drag & drop for main jobs with many sub-jobs, you can comfortably schedule them here by clicking. To do this, select below "new employees" between request, available, book directly or absent/time off. If you now click on the fields of an individual subjob, the employee will be scheduled accordingly. If you want to add employees who do not appear in the list yet, go to Add employee in the upper right corner and drag and drop the corresponding employee into the list. Then send the request or booking email via the email icon in the top right corner.
By ticking "Categories", the individual employees will be listed according to their categories.


