Edit and create base data in the WebApp
Depending on your access rights, you can view, create and edit base data in the WebApp with restrictions. Restricted means that you can only create and edit personal information, categories and user groups here, as well as view emergency contacts and documents.
Employees / Freelancers / Subcontractors
View
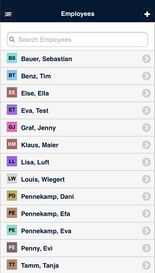
Here you can see all the staff members stored in the base data. Click on a specific staff member to see their contact information, their personal information, the categories they belong to, their emergency contacts and the documents they have uploaded. For subconstractors, you will see the contact persons instead of the emergency contacts.
You can reset the respective password here if it has been forgotten and you can send direct e-mails.
Edit
To edit, select a staff member and then click on the pencil icon in the top right-hand corner. Here you can edit the personal information, the address, the system language, the categories and the user groups. Then click on the hook in the top right-hand corner.
Create
Click on the plus sign in the top right-hand corner of the employee base data to create a new employee. Then enter the personal information, save the system language, the categories and the user groups. Then set a hook at "Send an email with login details". All other relevant data (such as statement and time recording periods) must be entered in the desktop view.
Vehicles
View
Here you can see all the vehicles stored in the base data. Click on a specific vehicle to see its information, the mileage allowance, any notes or documents stored, and upcoming inspections.
Edit
Click on one of the vehicles and then on the pencil symbol at the top right. Now you can edit the information and the mileage allowance. Then click on the hook in the top right-hand corner.
Create
Click on the plus sign in the top right-hand corner of the vehicle base data. Then enter the information and the mileage allowance and confirm by clicking on the hook at the top right.
Clients / Locations
View
Here you can see all the customers or locations stored in the base data. Click on a specific customer (or location) to see their information, contact person(s) and uploaded documents.
Edit
Click on a customer/location and then on the pencil symbol in the top right-hand corner to edit the information. Then confirm by clicking on the hook at the top right.
Create
Click on the plus sign in the top right-hand corner of the base data of the customer or location. Enter the information and confirm it by clicking on the hook at the top right.


