Create jobs in the WebApp: Difference between revisions
No edit summary |
No edit summary |
||
| Line 1: | Line 1: | ||
[[File:Create a job .jpg|thumb| | [[File:Create a job .jpg|thumb|215x215px|Create a job ]] | ||
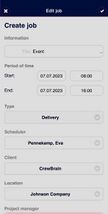
In the calendar and via "my jobs" you can - depending on your access rights - create new jobs via the plus sign at the top right. First enter all the relevant information and confirm it with the hook in the top right-hand corner. | In the calendar and via "my jobs" you can - depending on your access rights - create new jobs via the plus sign at the top right. First enter all the relevant information and confirm it with the hook in the top right-hand corner. | ||
Revision as of 10:09, 7 July 2023
In the calendar and via "my jobs" you can - depending on your access rights - create new jobs via the plus sign at the top right. First enter all the relevant information and confirm it with the hook in the top right-hand corner.
Employees
In the window that now opens, you can schedule employees. Click on "Employees" and then on the plus sign in the top right-hand corner. All employees, freelancers, service providers or vehicles will be displayed. Place a hook next to the desired employees. You can optionally enter their category and activity and, if the employee is paid by the hour or on a flat rate basis, change the preset wage here. When you confirm the selection with the hook in the top right-hand corner, you can choose whether the employees are to be requested, entered or booked directly. The employees automatically receive a request or booking email.
Subjobs
By clicking on "Subjobs" you get a list of all subjobs for the selected main job. If you go to one of the sub-jobs, you can edit it - depending on your access rights - exactly as described on this page. You can schedule employees, upload documents, write comments, create tasks, record time, and register yourself for the job.
Sub-jobs can only be created in the desktop view, not in the app.
Documents
Here you can upload documents for the job and decide for whom they should be visible.
Comments
Here you can post comments, upload documents and decide for whom they should be visible. Self-written comments can be edited or deleted afterwards. With the appropriate access rights, comments written by others can also be edited or deleted.
Tasks
Here you see a list of all tasks belonging to the job and you can also create new tasks here. To do this, enter the title of the task. In the next step, click on the task you have just created. Now you can enter a description, create sub-tasks, upload documents, post comments and enter working hours.
If you click on the pencil icon in the top right-hand corner, you can edit the task and assign it to an editor, set the priority and a due date, and indicate whether and when the task should be repeated.
All Working hours
Enter the workload of your job here. Enter the activity time category, and the time spent on it and confirm this with "enter".
Time clocks
You will only see this menu item if you have the appropriate access rights. Then you will see all employees involved in the job and can record their times via time clock. To do this, place a hook by the relevant staff member and then click on "In" to start time recording, on " Pause" to record breaks and on "Out" to end time recording again. The times are automatically recorded for the corresponding staff member. Depending on the settings ( in the desktop view via Administration > Time recording > General), the times must first be approved.
Offer services for this job
Here you can - depending on access rights - enter yourself for the job. Optionally, you can enter an activity and leave remarks. Then click on "Offer service". If you have entered yourself for this job, the following three menu items appear:
Booked
Here you can enter your availability for the job - "yes", "no", "not specified" - and add a comment if required. Then click on "save". The specified availability is then stored in the job.
Working hours
Depending on the payroll type, you will see the item "Payroll" (in the case of payroll by hours and flat rates) or "Working hours" (in the case of working time recording with flexitime account) in your view. Under both items you see the recorded working times and can add new ones below.
Travelling expenses
Under "itinary" you enter your itinerary with the date and time of departure and destination. Save and go back to the travel expenses. The meals and accommodation per diems are calculated on the basis of the travel itinerary. Specify whether an overnight stay took place and which meals were consumed as part of the per diems.Save and go back to the travel expenses. For ride costs, enter the vehicle you drove, the licence plate and how many kilometres you drove. Save, so that the kilometre allowance can be calculated. (The default setting here is the legally prescribed 0.30€/km for Germany. Under Administration > Travel expenses > General you can click on "Use individual mileage for each employee". These can then be stored individually in the accounting and time recording periods). Under "Receipts" you can submit receipts by clicking on the plus sign at the top right. Specify the type of receipt. Enter the date and the amount and whether you paid yourself or the company paid. Then upload the receipt and write a comment if necessary. Save. If you now go back to travel expenses, you can submit the travel expense report. This will now be checked and paid out by the corresponding scheduler or must be revised again.
