Time clock in the desktop view: Difference between revisions
mNo edit summary |
mNo edit summary |
||
| Line 1: | Line 1: | ||
[[File:Time clock desktop view.png|thumb|160x160px|Time clock desktop view]] | [[File:Time clock desktop view.png|thumb|160x160px|Time clock desktop view]] | ||
Clicking on the time clock in the menu bar opens a screen. The default setting is to clock in for the job for which you are currently booked. In the upper tab you can also select whether you want to record independent working times (not assigned to a job or project) or times on another job or project. Under Administration > Projects > Defaults you can select which project types should be visible to whom in the time clock. In the lower tab, you select whether it is working time, travel time or school/training. These time categories can be configured under Administration > Time tracking > Time categories. Now click on "in" so that the time clock starts counting, on " pause" for breaks and on "out" if you want to clock out again. The times recorded in this way are automatically stored in the statements or time recording and in the corresponding job or project. | Clicking on the time clock in the menu bar opens a screen. The default setting is to clock in for the job for which you are currently booked. In the upper tab you can also select whether you want to record independent working times (not assigned to a job or project) or times on another job or project. Under Administration > Projects > Defaults you can select which project types should be visible to whom in the time clock. In the lower tab, you select whether it is working time, [[Driver's log|travel time]] or school/training. These time categories can be configured under Administration > Time tracking > Time categories. Now click on "in" so that the time clock starts counting, on " pause" for breaks and on "out" if you want to clock out again. The times recorded in this way are automatically stored in the statements or time recording and in the corresponding job or project. | ||
Under Administration > Time Recording > General you can set whether the times recorded by time clock have to be approved. There you can also set that times within a certain period or working times that coincide with the times specified in the job are automatically approved. | Under Administration > Time Recording > General you can set whether the times recorded by time clock have to be approved. There you can also set that times within a certain period or working times that coincide with the times specified in the job are automatically approved. | ||
Latest revision as of 09:19, 30 June 2023
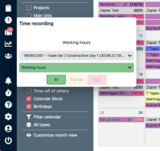
Clicking on the time clock in the menu bar opens a screen. The default setting is to clock in for the job for which you are currently booked. In the upper tab you can also select whether you want to record independent working times (not assigned to a job or project) or times on another job or project. Under Administration > Projects > Defaults you can select which project types should be visible to whom in the time clock. In the lower tab, you select whether it is working time, travel time or school/training. These time categories can be configured under Administration > Time tracking > Time categories. Now click on "in" so that the time clock starts counting, on " pause" for breaks and on "out" if you want to clock out again. The times recorded in this way are automatically stored in the statements or time recording and in the corresponding job or project.
Under Administration > Time Recording > General you can set whether the times recorded by time clock have to be approved. There you can also set that times within a certain period or working times that coincide with the times specified in the job are automatically approved.
